
Ooni Pizza Dough Recipe - 65% Hydration, No-Kneading
This pizza dough recipe is formulated especially for Ooni pizza ovens with extra hydration and improved gluten development.
Ingredients
- 300 g Tipo 00 or Bread flour (2.4 cups) Note: All purpose works as well, as long as it's high in gluten and protein. If the flour is weak, the dough will be as well.
- 200 ml Lukewarm Water (0.8 cups)
- 1/4 tsp Active or Instant Dry Yeast Note: If you plan on using the dough sooner than 24 hours, triple the yeast. More yeast = faster rise but less flavor.
- 9 g Fine Sea Salt (1.5 tsp)
- 7 g Extra Virgin Olive Oil (1.5 tsp) Optional: Improves stretch and softness of dough, but not strictly necessary.
- 9 g Honey (0.5 tbsp) Optional: Not necessary when using an Ooni pizza oven unless you want an extra dark and crispy crust. Great for American styles, not needed for Neapolitan.
Instructions
Ingredients Prep
- First, measure out the water and yeast in a large mixing bowl. Stir lightly until the yeast is fully hydrated and the water is a slightly brown color.
- Set the mixing bowl with water and yeast to the side. In another bowl, measure out the flour and salt. Gently mix the salt into the flour using your finger.
- Have your olive oil ready somewhere nearby. We're not going to add this into the recipe until about halfway through the process.
Mixing The Ingredients
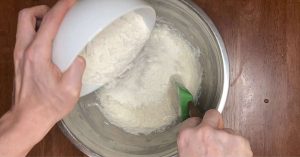
- Using a hard spatula or wooden spoon, start to slowly stir the flour and salt mixture into the bowl of water and yeast. I find it's best to mix in a few spoonfuls of flour at a time rather than dumping it all in at once. Do this until you've mixed in roughly 75% of the flour.
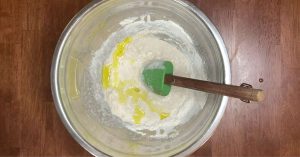
- Optional: When roughly 75% of the flour is mixed into the water, add the tablespoon of extra virgin olive oil and fully incorporate it into the dough mixture.
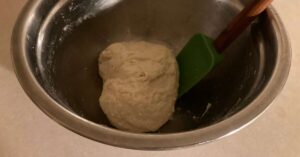
- Mix the remaining 25% if flour into the rest of the ingredients. You can stop mixing when you can't see anymore dry flour in the bowl. It should be a rough, shaggy ball of dough.
Preparing The Dough (No-Knead Method)
- Cover the bowl tightly with an air-tight lid or plastic wrap and let it sit at room temperature for approximately 15 minutes.
- After 15 minutes, come back and give the dough another mix with the spatula. You should find that the dough is much smoother and less sticky because of gluten development. Turn and fold the dough onto itself for another 1-2 minutes and cover it back up tightly.
- Let the dough rest at room temperature for 2-3 hours, then place it in the fridge to cold-ferment overnight. 24 hours is ideal, but 48-72 is better. Longer fermentation = better taste and texture.
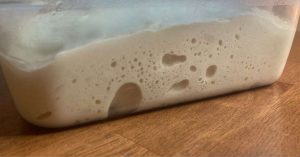
- The dough won't rise much in the fridge, or in the 2-3 hours before due to the minimal amount of yeast used in the recipe. This is normal, but you should notice some changes in texture and bubbles forming. When the dough is balled and proofed later, each dough ball will approximately double in size.
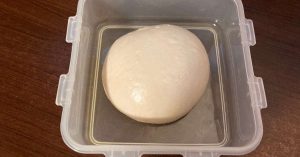
- Take the dough from the fridge and divide it in half into two 250 gram dough balls. While the dough is cold, handling will be easy but you can (very) lightly coat your hands in olive oil to avoid sticking.
Proof The Dough Balls
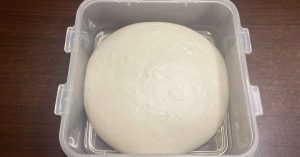
- Form each piece of dough into tight balls. If you need help with this step, follow my tutorial on dough balling below. Place each dough ball into a lightly oiled resealable container. Let the dough "proof" in its container at room temperature for 4-6 hours. The dough ball will expand (about x2) and become light and airy.Note: The warmer the room, the faster the dough will proof. If its too warm or left too long, the dough will "overproof", which degrades its structure and taste.https://www.myhouseofpizza.com/how-to-shape-pizza-dough-ball-proofing-guide/
- When the dough is fully proofed, it will look something like this.
Making The Pizza
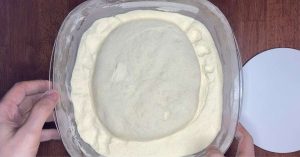
- When the dough is fully proofed, get a large container full of semolina flour, or just make a pile on a clean counter. Flip the oiled container with the dough upside down and it should slide out into the flour. Flip the dough over to coat all sides with flour, but be careful not to squeeze the dough or ruin its shape. This is called a "flour bath".
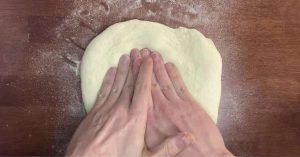
- At this point, you can prepare the dough however you're accustomed to, but I recommend stretching by hand by carefully pressing from the middle of the dough ball outwards to move the air into the outer edges. Don't pinch the edges if you want a puffy crust.Don't be afraid to use as much semolina as necessary to avoid sticking, but only use it to coat the dough, don't knead it it or you risk changing the hydration ratio.If you need a visual guide for stretching pizza dough by hand, check out my tutorial below:https://www.myhouseofpizza.com/how-to-hand-stretch-pizza-dough/
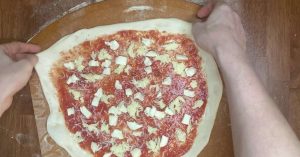
- When the dough is stretched to your liking, carefully transfer to a floured pizza peel (you can slide it on, or carefully lift it from underneath), then top it with your preferred toppings and give the peel a shake to make sure it isn't sticking. Give the dough a final stretch by carefully pulling the edges in each direction (don't pinch) and quickly launch it into your Ooni pizza oven. If you used enough flour on the peel, and haven't overloaded with wet toppings, it should slide off easily without losing its shape. It it doesn't, use more semolina next time.
Notes
This recipe assumes you're OK with letting the dough cold-ferment for 24-72 hours. This is ideal in terms of taste and texture, but if you need it sooner (within 12 hours or so), you'll have to knead the dough by hand and add more yeast.